Hi friends! I’m sharing the easiest way to screen print your own shirts and decor with your Cricut! This video is sponsored by Cricut #cricutmade Scroll down to see the full video tutorial.
I’ve shared a ton of Cricut projects over the years on my channel, but one thing I’ve never done (until recently) was screen print using stencils made from my Cricut. I recently bought a kit on Amazon on a whim, and tried it out to create some screen printed tote bags for my sister-in-law’s bachelorette party and I was hooked! It’s so much easier than I even thought it would be, so I’m very excited to be sharing a step-by-step screen printing tutorial with you today!
I’ve found tips, tricks, and great Cricut hacks to make your own personalized apparel and decor affordably and quickly! I made all three of these sweatshirts for under $15/each – SO MUCH LESS than what you would pay to buy them. Let’s get crafting!
Disclaimer: This post contains affiliate links. This means I may earn a commission should you choose to sign up for a program or make a purchase using my link. I won’t ever share a link for a product/service I haven’t tried myself. Read my full disclosure policy here.
Cut files:
These are the cut files that I am going to use but literally any can be used with this same method. All of the ones that I am using are single layer as that is simpler when screen printing.
Screen Printing Method #1 – Reverse Vinyl
Start by loading the adhesive vinyl onto the cutting mat like you normally would, with the colored side facing up. Use the vinyl setting on your Cricut or applicable Silhouette setting.
*TIP: Try to place your design in the middle of the vinyl sheet before cutting. This will give you space around the design when screen printing, to avoid getting ink on your shirt outside the design.
Be sure to MIRROR YOUR DESIGN. This is key, and not the way you would usually cut adhesive vinyl. But you will be putting the vinyl on the underside of the screen (which you sill see in a bit) so you need the design reversed.
After you cut your design and unload it from the machine, you will weed it. This step is different from your normal vinyl projects as well. You need to weed out the actual design, not what’s around it.
Think of it this way… you need to weed out all the places where you want to see the ink on the shirt. That will leave you with the design seen in white like the picture above.
Now lay a piece of transfer paper over the whole sheet and remove the white backing from the vinyl.
Then place the vinyl design on the underside of the screen printing frame and remove the transfer paper.
*TIP: If you pull it off carefully, you can reuse the transfer paper. I’ve used the same one for several projects like this.
Turn the screen over so the design lays flat on the shirt. And now you will be able to see the true design face up.
Pour a line of screen printing ink along the bottom, top, or side of your design (wherever you have the most room), then use a squeegee to spread the ink across your design. Be careful not to go outside the vinyl to avoid getting ink on your shirt where you don’t want it.
*TIP: A little ink goes a long way. Start with a small amount and apply more if needed. And put the excess ink back in the jar, it will last you through several projects.
*TIP: You need to apply somewhat strong pressure when filling in your design with ink. If your touch is too light, you won’t get enough ink through the screen and onto your fabric.
*TIP: Make sure the ink is distributed across the whole design equally or you will see variations in the ink in the final design where it is thicker in some places and thinner in other places.
Carefully pull off the screen print frame and let it dry for a while. I let mine dry for several hours or a whole day.
*TIP: Make sure you have the design covered with ink the way you want it before you pull up your screen. If you try to put your screen back down for a second application of ink, it won’t match up exactly, making your final design look a little funky.
Once it’s fully dry you need to heat the ink to set it into the fabric. I press my shirts on my heat press for about 20 seconds at 250-300 degrees.
*TIP: You may want to place an extra teflon sheet or a towel inside your shirt while pressing. The screen printing ink bled through the back of one of my shirts during heat pressing. This did not happen on another shirt, so it may depend on the type of material. But better safe than sorry!
Rinse your screen soon after finishing your project, unless you plan to use the same design on multiple shirts. (Which you can do, as seen a little later in this post.) You should be able to rinse it clear with just water, but sometimes soap is needed to get some stubborn ink off.
Using reverse vinyl is by far my favorite way to screen print. It avoids pulling up small pieces of the design, as you will see is a danger with one of the other methods below. And this method would be best for intricate designs with lots of small pieces.
But if you struggle with the reverse method or you’re doing a super simple design, you can do the top vinyl method.
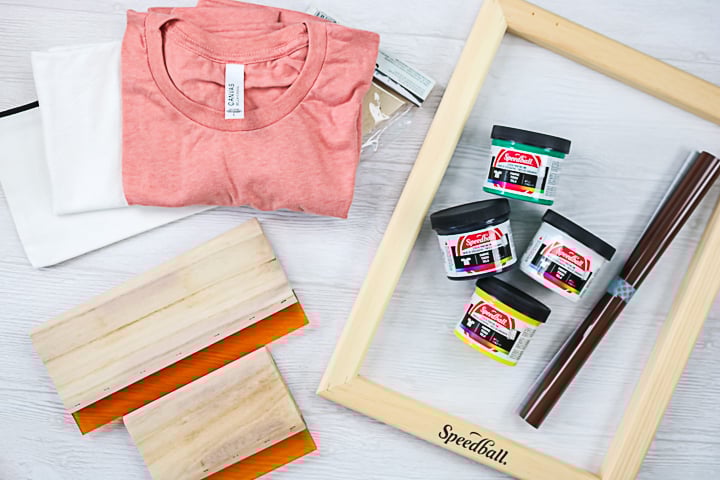
Supplies needed:
FAQ
What kind of vinyl do you use for screen printing?
Can vinyl be screen printed?
