Japanese udon noodles are made from all-purpose flour, salt, and water. Although the ingredients aren’t difficult, it can take some practice to make uniform noodles with a smooth, bouncy texture. I’ll walk you through every step you need to take in this udon tutorial so you can start preparing these delectable noodles in your own kitchen.
Weighing your flour, water, and salt is what you should do first. The success of this recipe depends on accuracy, so if you don’t already own a scale, I suggest getting one. When you own a digital scale, you’ll understand how much simpler (and more precise) it is to weigh ingredients rather than measure them out with cups. You can purchase one on Amazon for around $10.
Once everything has been measured, you must create a brine by combining salt and water. Make sure the salt crystals are completely dissolved.
Next, you want to hydrate the water in stages. This is accomplished by whisking the flour with your fingers after adding the brine to it in three to four additions. The goal is to evenly hydrate the noodles so that you have shaggy dough with pieces that are all around the same size. It’s undesirable to have some areas that are extremely wet and others that are entirely dry.
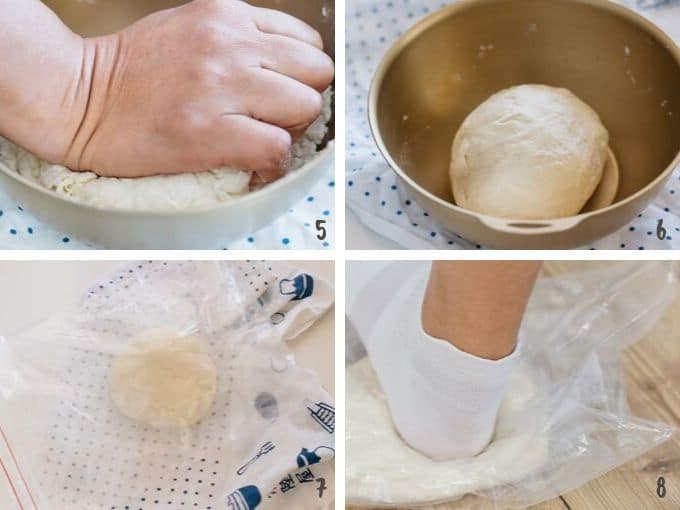
The dough can be kneaded into a ball once the flour has been moistened evenly. Try covering the bowl and letting the dough rest for 30 minutes if the dough is still a little fragile before continuing.
The dough ball can now be moved to a clean work surface and kneaded. To press the dough out, you should use your hand’s palm and your weight. The dough can then be folded again before being repeated 150–200 times. The finished udon dough should be extremely elastic and springy.
Stretch out the top of the kneaded dough and tuck it into the bottom to form a ball. To prevent the dough from drying out, put the ball of dough in a bowl and cover it. Allow this to rest for between 1.5 and 2 hours. This allows the gluten to loosen up so you can roll it out uniformly (works for pizza dough too).
After the dough has had time to rest, generously starch it before pressing it into a thick disk.
Press the dough out gradually with a rolling pin starting from the center of the disk moving away from you. After each press, you should pick up the pin and advance it before pressing again. After that, press the dough from the center towards you using a similar motion.
Press out from the center and in from the center after rotating the dough 90 degrees.
The dough should then be rolled out from the center, in from the center, turned 90 degrees, and repeated. You should now have a sheet of dough that is roughly 1/4 inch thick, square in shape, and has rounded corners. However, the thickness of the dough is still too great to make udon noodles.
More starch should be sprinkled over the dough sheet before rolling it onto the rolling pin and rolling it away from you while sliding your hands out of the middle of the dough sheet. This simultaneously stretches the dough in both directions, maintaining the shape.
Unroll the dough from the rolling pin when it is about 1/8 of an inch thick, and then rotate it 45 degrees so the square’s straight edge is facing you. Re-starch the dough, then roll it onto the pin beginning at the straight edge. The dough can be evened out by rolling it a few times in this direction.
You should now have a roughly square sheet of dough that is about 1/8 of an inch thick after unrolling it.
The dough should be generously dusted with starch before being folded several times like a fan, but stagger each fold so that no two are directly on top of one another. By doing this, the dough is kept from flattening out too much where the folds are.
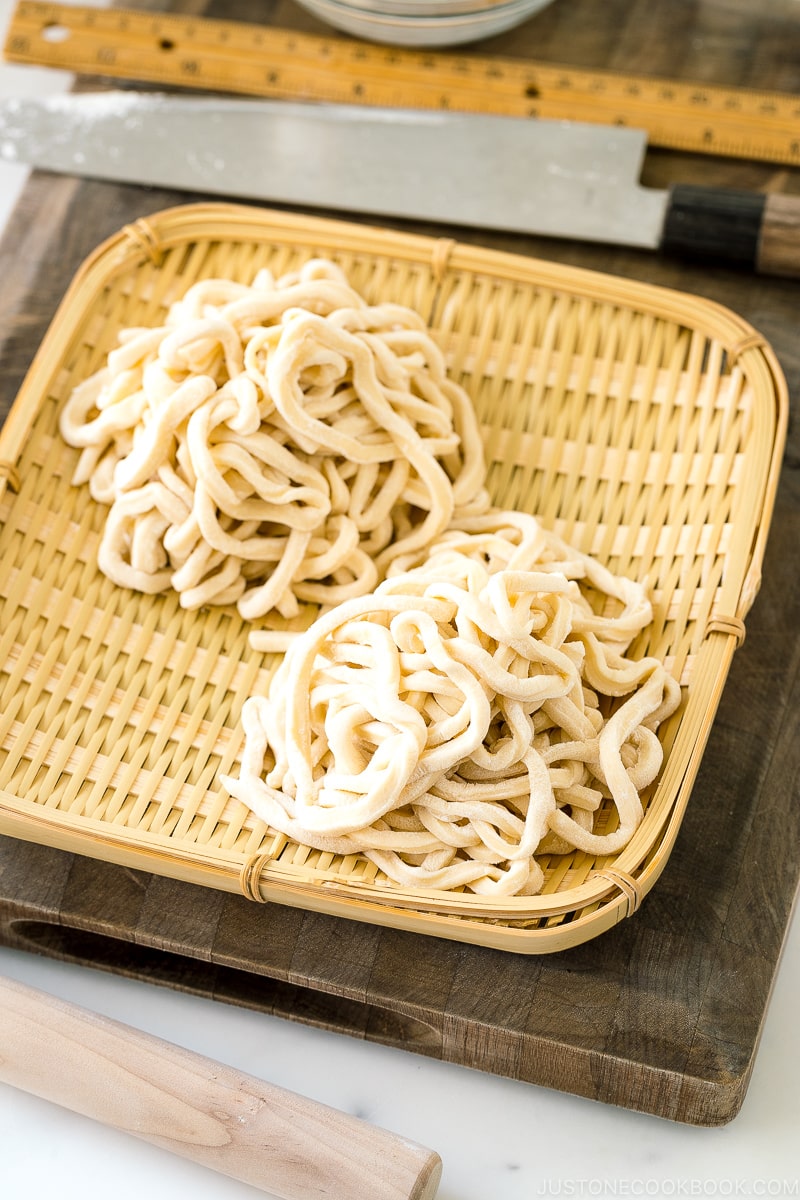
After transferring the dough to a cutting board, fill the folds with additional starch. Slice the udon noodles with a large, sharp knife in a single motion without exerting much downward pressure. The udon will double in thickness when they are boiled, so you can cut them as thick as you like.
I usually do this in batches and separate the udon I’ve cut by adding more starch to them and curling them into nests because if you let the cut noodles sit too long after they’re sliced, they can stick back together again.
Bring a large pot of water to boil. The water is already very salty, so you don’t need to salt it. Make sure to use a lot of water to thin out the starch on the Udon’s surface.
To prevent the Udon from sticking together, add as many servings of noodles as you need and stir for the first 30 seconds. Noodles should be cooked for 12 to 13 minutes for noodles with a diameter of about 1/8 inch, maintaining a low boil the entire time. Watch the pot carefully because it could easily boil over.
When the noodles are finished cooking, drain them and give them a thorough rinse in cold water to get rid of any leftover starch.
Udon is a very adaptable noodle that can be made both hot and cold. No matter how you intend to use them, they must always be boiled first. I also advise washing them once to remove any excess starch.
After that, they can be reheated in hot water and served in soup with a variety of toppings or with Mentsuyu, a potent dipping sauce. Noodles for chilled Udon are frequently served with mentsuyu and a variety of toppings, such as nori, scallions, shiso, ginger, or wasabi. The noodles are now combined with vegetables, protein, and a dressing to serve chilled udon more like a Western salad. You can replace the soba noodles in this recipe for soba noodle salad with two portions of udon.
Udon is also excellent for stir-fries like Yakiudon because they resist turning mushy. Below is a list of some of my udon noodle recipes with links to them.
Udon is one of three traditional wheat-based Japanese noodles, the other two being Hiyamugi and Somen. Depending on the region of Japan, it is prepared differently, but typically it is rolled and cut into relatively thick noodles. Inaniwa Udon, which is hand-pulled, and Ht, which are cut into extremely wide strips, are examples of variations.
Udon can be served with a cold concentrated broth or a hot broth. Both of these are prepared using a Mentsuyu () base, which is composed of concentrated dashi, soy sauce, sake, and sugar. Please see my Mentsuyu recipe for more details.
It is proper to pronounce each of the two syllables in the word “u-don” as follows: “u like oops don like donut, not “dawn”
Japanese flour is processed in a special way that modifies the mineral content and gives it a light yellow hue. Other countries’ all-purpose flour will work, but the noodles will probably be beige or grey in color.
No, udon is made from wheat flour, which contains gluten, giving them their distinctively bouncy texture.
Overview: Quick Steps
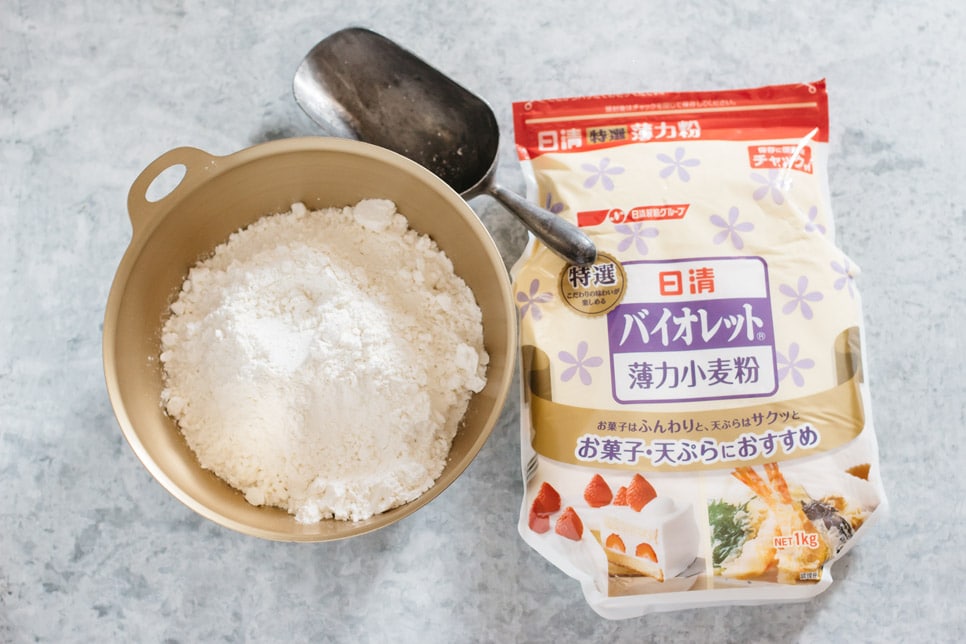
Three simple ingredients to make Udon noodles
There are only a few ingredients needed to make udon noodles: flour, water, and salt. Also it is quite simple to make. selecting the proper ingredients is therefore crucial.

To make Udon noodles, any flour with a protein content of between 8 and 10% is suitable. For making cakes and pastries but not noodles, flour with less than 8% protein is preferable. I used wheat flour with 9% protein that I purchased from a neighborhood Japanese grocery store in Brisbane. All-purpose flour typically contains 10 to 12%, so using it is a good idea.
The tap water in Japan is soft water. So we need to use similar water. The water here in Brisbane, Australia, where I reside, is particularly hard. I used filtered water for this reason. You can always boil the water and let it cool if you don’t have a filter.
To tighten the gluten and harden the dough, salt is added. The dough texture and hardness depends on the temperature. Between 13% in the summer and 10% in the winter, the salt content of the dough is controlled to maintain a specific level of hardness.
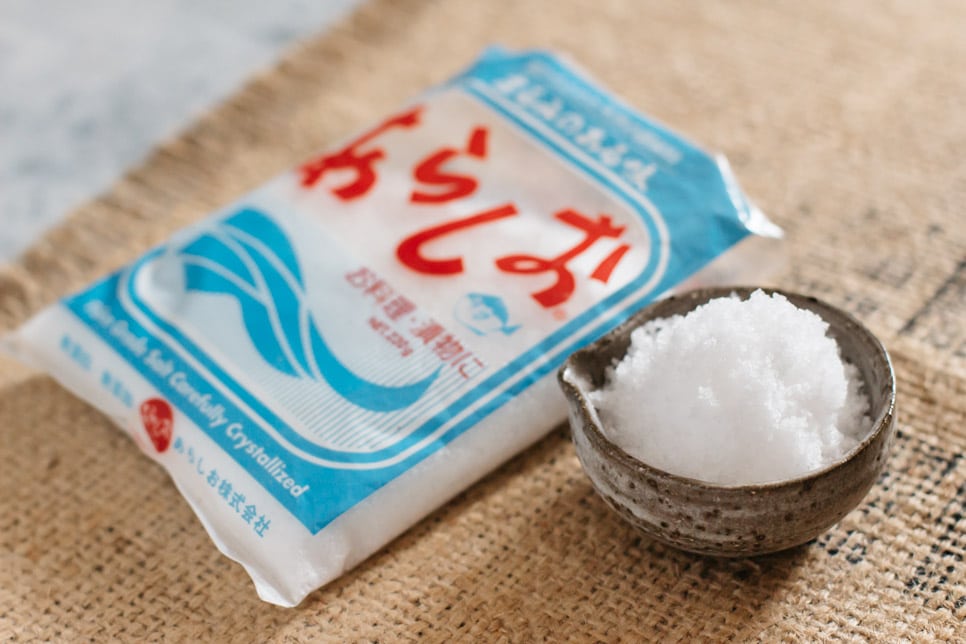
When the udon noodles are cooked, 90% of the salt that was added to the dough will dissolve into the boiling water.
Tip #9: Roll out the corners of the dough
The dough should ideally be rolled out into a perfect square or rectangular shape. That way, all of your noodles will have equal length.
FAQ
What is the difference between udon noodles and regular noodles?
Udon is a type of thick, white noodle made from wheat flour, salt, and water. They are prepared similarly to ramen but are thicker and more consistent.
How would you describe udon noodles?
Udon are chewy Japanese noodles that are typically served in a straightforward dashi-based broth and are made from wheat flour, water, and salt. They are typically two to four millimeters thicker than buckwheat soba noodles and can be either flat or rounded.
Are ramen noodles the same as udon noodles?
Although both of these varieties of noodles are made of wheat flour and have a chewy texture, there are some significant differences between them: Size: Udon noodles are thicker than ramen noodles. Udon noodles are often straight while ramen noodles are wavy.
What kind of noodles are udon?
Udon noodles are a type of wheat flour noodle frequently used in Japanese cuisines, or just Udon as we would say in Japan. These thick noodles are adored for their flavorless, springy texture.
